Sudoku guide
How to play and solve Sudoku
The rules fit in three lines. Solving is careful scanning, and below it is shown on a real puzzle from this page, one step at a time, with the reason for every number.
How to play Sudoku
- Fill every empty square with a number from 1 to 9.
- Each row and each column uses every number once.
- Each of the nine 3×3 boxes uses every number once too.
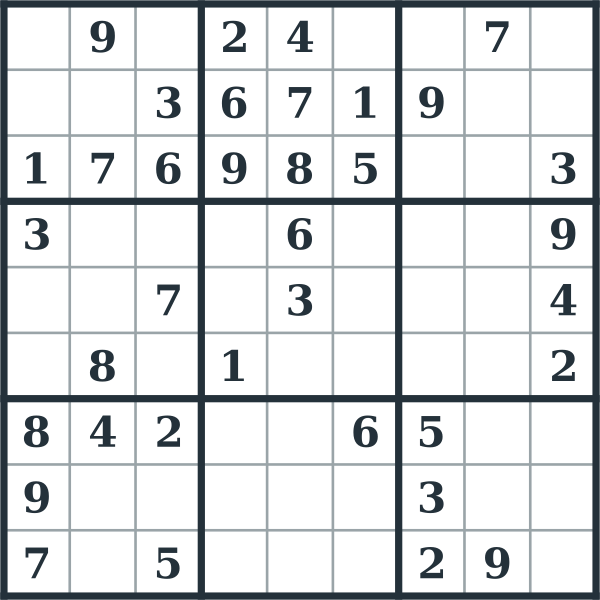
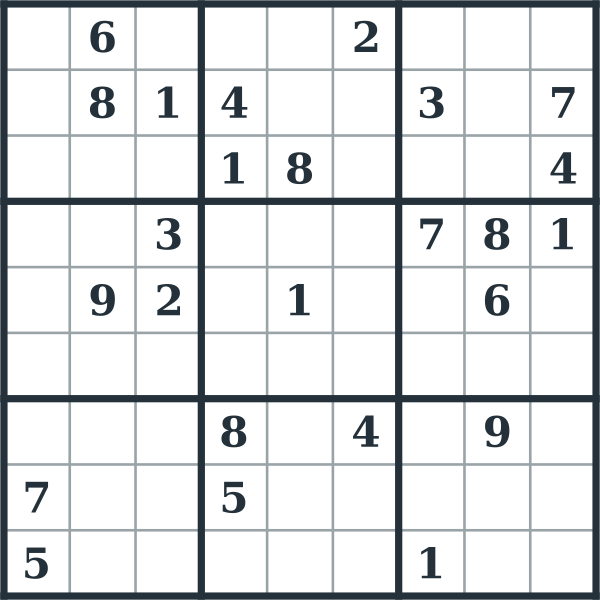
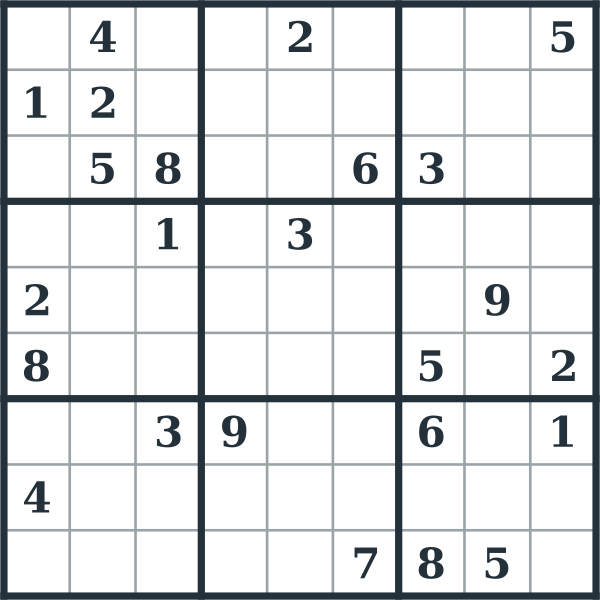
There is no arithmetic: the numbers could as well be nine letters or colors. Every puzzle on this page has exactly one answer, and you can reach it by reasoning alone. Here is an Easy sheet from this page, and its answer.
How to solve a Sudoku, step by step
This is an Easy sheet from this page's generator, with 36 numbers printed. It is solved below with moves you make just by looking, no pencil marks. Each step is computed from the puzzle, not written by hand. The highlighted square is the one each step fills, and the shaded squares are the row, column or box it reads.
Step 1. Column 2 now has every digit except 8, so its last square, row 7, column 2, is 8.
Step 2. In the top-right box, the 3 can only go at row 3, column 8: every other empty square already has a 3 in its row or column.
Step 3. In the top-middle box, the 3 can only go at row 1, column 5: every other empty square already has a 3 in its row or column.
Step 4. In the top-right box, the 6 can only go at row 2, column 7: every other empty square already has a 6 in its row or column.
Step 5. In the top-right box, the 8 can only go at row 2, column 9: every other empty square already has an 8 in its row or column.
Step 6. The top-right box now has every digit except 9, so its last square, row 1, column 9, is 9.
Step 7. In the top-left box, the 8 can only go at row 3, column 3: every other empty square already has an 8 in its row or column.
Step 8. In the top-left box, the 9 can only go at row 3, column 1: every other empty square already has a 9 in its row or column.
Step 2 is the move most of a Sudoku is solved with: pick a box and a number it is missing, then cross off every square where that number would clash with its row or column. When one square is left, the number goes there. Step 1 is the quickest move of all: a row, column or box with one gap.
The other 37 steps use the same moves: a digit with only one place left (18) and last square in a row, column or box (19). Try them on the grid before you open the list.
Show steps 9 to 45
- In the top-left box, the 5 can only go at row 1, column 1: every other empty square already has a 5 in its row or column.
- Row 1 now has every digit except 2, so its last square, row 1, column 4, is 2.
- The top-left box now has every digit except 2, so its last square, row 2, column 3, is 2.
- In the top-middle box, the 9 can only go at row 2, column 4: every other empty square already has a 9 in its row or column.
- In the middle-right box, the 2 can only go at row 6, column 9: every other empty square already has a 2 in its row or column.
- Column 9 now has every digit except 4, so its last square, row 9, column 9, is 4.
- In the middle-right box, the 9 can only go at row 4, column 8: every other empty square already has a 9 in its row or column.
- In the middle-right box, the 4 can only go at row 5, column 8: every other empty square already has a 4 in its row or column.
- In the middle-right box, the 8 can only go at row 5, column 7: every other empty square already has an 8 in its row or column.
- The middle-right box now has every digit except 7, so its last square, row 6, column 7, is 7.
- Column 7 now has every digit except 9, so its last square, row 9, column 7, is 9.
- In the bottom-left box, the 1 can only go at row 9, column 3: every other empty square already has a 1 in its row or column.
- In the bottom-left box, the 3 can only go at row 9, column 1: every other empty square already has a 3 in its row or column.
- In the bottom-left box, the 2 can only go at row 7, column 1: every other empty square already has a 2 in its row or column.
- Column 1 now has every digit except 7, so its last square, row 8, column 1, is 7.
- The bottom-left box now has every digit except 4, so its last square, row 8, column 3, is 4.
- Row 8 now has every digit except 8, so its last square, row 8, column 8, is 8.
- In the bottom-middle box, the 1 can only go at row 7, column 4: every other empty square already has a 1 in its row or column.
- Row 7 now has every digit except 7, so its last square, row 7, column 8, is 7.
- Column 8 now has every digit except 2, so its last square, row 9, column 8, is 2.
- In the center box, the 1 can only go at row 6, column 6: every other empty square already has a 1 in its row or column.
- In the top-middle box, the 1 can only go at row 2, column 5: every other empty square already has a 1 in its row or column.
- Row 2 now has every digit except 7, so its last square, row 2, column 6, is 7.
- In the center box, the 3 can only go at row 4, column 6: every other empty square already has a 3 in its row or column.
- Column 6 now has every digit except 4, so its last square, row 3, column 6, is 4.
- In the middle-left box, the 3 can only go at row 6, column 3: every other empty square already has a 3 in its row or column.
- Row 6 now has every digit except 5, so its last square, row 6, column 4, is 5.
- In the top-middle box, the 5 can only go at row 3, column 5: every other empty square already has a 5 in its row or column.
- Row 3 now has every digit except 6, so its last square, row 3, column 4, is 6.
- In the middle-left box, the 5 can only go at row 5, column 3: every other empty square already has a 5 in its row or column.
- Column 3 now has every digit except 7, so its last square, row 4, column 3, is 7.
- In the center box, the 4 can only go at row 4, column 4: every other empty square already has a 4 in its row or column.
- Row 4 now has every digit except 8, so its last square, row 4, column 5, is 8.
- In the center box, the 6 can only go at row 5, column 5: every other empty square already has a 6 in its row or column.
- Row 5 now has every digit except 7, so its last square, row 5, column 4, is 7.
- Column 4 now has every digit except 8, so its last square, row 9, column 4, is 8.
- Row 9 now has every digit except 7, so its last square, row 9, column 5, is 7.
Three mistakes that cost the most time
- Writing a number in because it fits. A number that breaks no rule yet is not the answer until it is the only one that fits.
- Scanning only rows. Boxes are usually the quickest place to look, so check every box for each number before you start on rows.
- Pencil marks too early. On Easy and Medium sheets you never need them. Save them for when scanning stops working.
Sudoku difficulty levels, and the strategies each one needs
On most sites a harder Sudoku just has fewer numbers printed. Here a level is the hardest move a puzzle needs, measured: every puzzle is solved by a program limited to moves a person makes on paper, and the generator keeps going until a puzzle needs its level's move.
| Level | What it needs | Numbers printed |
|---|---|---|
| Easy | Scanning only: a digit with one place left, or a row, column or box with one gap. | 36 |
| Medium | The same moves, with fewer numbers to work from, so each one takes longer to find. | 25.2 |
| Hard | Pencil marks. Write the possible digits small in each square, then look for a pointing pair (a digit that can only go in one row of a box, so it can be crossed off the rest of that row) or a pair (two squares that can only hold the same two digits, so the rest of their row, column or box cannot). | 24.5 |
| Expert | Testing a digit. In a square with two possibilities, pencil one in and follow it with the moves above; if the grid breaks, the other one was right. That is proof, not guessing. | 24.3 |
Averages from 6 sheets per level, made and solved when this page is built. Every one needed its level's move. Of the Hard sheets, 4 needed a pointing pair and 2 a pair or triple; the Expert sheets needed 2.2 tested digits on average.
Notice the numbers column. Medium, Hard and Expert sheets print about the same number of clues, and what separates them is the move they need, not how many numbers you start with. Easy is the only level that keeps extra numbers on purpose, so a beginner always has somewhere to look.
The solver also knows X-wings and swordfish, the next patterns in most Sudoku books. In the 6 Expert sheets measured here, none of them was the move that decided the puzzle.
Which Sudoku to print
Every sheet is a standard 9×9. These are the settings we would start from.
| Who it is for | Settings | Why |
|---|---|---|
| A first Sudoku | Easy, one per page, rules page on | Plenty of numbers to scan from, and no step needs pencil marks. |
| Children ready for 9×9 | Easy, two per page, name and date on | Two sheets to a page is a lesson's worth. Younger children usually start on a 4×4 or 6×6, which this page does not make yet. |
| Seniors and older eyes | Easy or Medium, large print | Large print puts one grid on the page, 7 inches wide on Letter, with squares about ¾ inch across and bigger numbers. |
| A daily puzzle | Medium, two per page | No pencil marks needed, but few enough numbers to make you look. |
| Puzzle fans | Hard or Expert, one or two per page | Pencil marks need room; four to a page leaves squares about a third of an inch across. |
- Answer keys come with every PDF, two to four to a page, with no sign-up.
- Every pack is new. Press New preview for another set; there is no daily limit and nothing to run out of.
- Ink-saving lines lighten the thin rules and keep the 3×3 boxes bold.
- A level is about the moves, not the time. A Hard sheet with one early pointing pair can go faster than a Medium that hides its singles well.
- Only 9×9 for now. No 4×4 or 6×6 mini Sudoku, and no six-to-a-page layout yet.
Free to print and copy
Every puzzle here is made by this site's own generator, in your browser, and solved before you see it, which proves it has one answer you can reach without guessing. More on that in how we make puzzle packs. The terms of use let teachers, tutors, clubs and families print and copy the puzzles and the answer keys without asking.